Apache Airflow Docker Tutorial

Prerequisites
What is Apache Airflow?
Airflow is an open-source platform created by the community to programmatically author, schedule, and monitor workflows.
It is an open-source tool to orchestrate and monitor complex computational workflows & data processing pipelines.
Basically, you can see it as a job scheduler, where a job can consist of multiple tasks with complex dependencies.
Airflow will run the task of your job at a set time, by following the defined dependencies.
Dependencies; which task will run first then the others, which tasks are dependent on, and what tasks are to be triggered?
Directed Acyclic Graphs.
In Airflow, workflows are written as code in form of Directed Acyclic Graphs (
DAGs) of tasks.A
DAGis a unidirectional, acyclic graph connecting the edges, where each node in the graph is a task, and edges define dependencies amongst tasks.A
DAGspecifies the dependencies between Tasks, and the order in which to execute them and run retries; the Tasks themselves describe what to do, be it fetching data, running analysis, triggering other systems, or more.In Airflow, the scheduler job will write the code as a
DAGdefinition file, wherein you list a series of tasks with the dependencies.Since workflows are written in
DAGs, so they become more dynamic, manageable, testable, and collaborative.Developed in Python so it is able to interface with any third-party Python API and can execute an endless variety of tasks irrespective of their language.
Use Cases.
Transferring Data from one task to another.
Performing Backups.
Automating DevOps operations.
Machine Learning jobs.
Recommendation Engines and More.
Automating ETL Pipelines.
History.
The Airflow community is strong, healthy, and vibrant, with over 1700 code contributors — and growing since its first commit in 2014.
The most recent version, Airflow 2.2, was released in the second half of 2021, combining two new big features and a whole lot of small quality-of-life improvements that make the tool even more powerful.
Benefits of Airflow.
A way to build complex & dynamic data pipelines with the following features:
Dynamic:
DAGin Airflow is completely dynamic and flexible in nature. Airflow pipelines are configured as code (Python). Allowing for dynamic pipeline generation and hence giving us full control over it.Extensible: Airflow provides a number of executors and operators which supports almost every type of task execution.
You can easily define your own operators, and executors and extend the library so that it fits the level of abstraction that suits your environment.
Scalability: “How many tasks it can measure” “multiple node worker systems allow us to deploy n-number of worker nodes.
Elegant UI to easily monitor your DAGs.
Centralized configurations for tracking.
🕯️ Airflow is simply a queuing system built on top of a metadata database.
Airflow Architecture.
An Airflow installation generally consists of the following components:
A scheduler, which handles both triggering scheduled workflows, and submitting Tasks to the executor to run.
An executor handles running tasks. In the default Airflow installation, this runs everything inside the scheduler, but most production-suitable executors actually push task execution out to workers.
A webserver, which presents a handy user interface to inspect, trigger and debug the behavior of
DAGsand tasks.A folder of
DAGfiles, read by the scheduler and executor (and any workers the executor has)A metadata database is used by the scheduler, executor, and webserver to store the state.
The metadata component stores any data related to your
DAGs, task logs, and airflow admin, this data provides info on jobs & keeps historical records of jobs also.
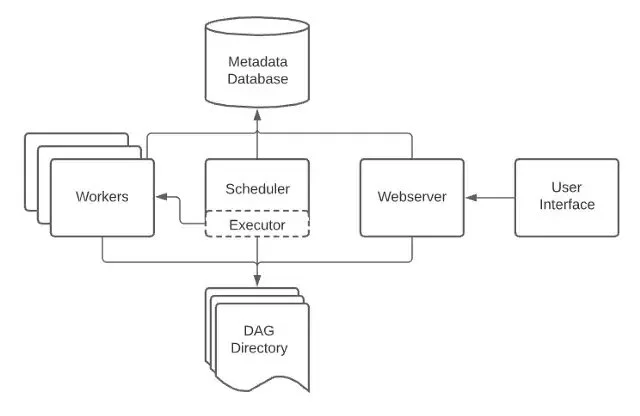
Fig 1: Airflow architecture showing components like metadata, scheduler, web-server, executor, workers.
Metadata
This metadata is a relational database that keeps a record of all your
DAGruns, tasks instances, queued tasks, task states like whether some task is running, success, failed, and all, or if you want more drilled details of a job like what are the top 10 tasks currently consuming most of the memory? these things are provided to us by metadata. Simply said, the metadata component stores any data related to your DAGs, task jobs, or Airflow admin.This data not only provides you the info on jobs that are currently running but it keeps a record of their historical runs also. So if you want to pull a report of say what jobs ran 5 days ago, how many
DAGswere in there, which all tasks ran, their execution times, etc that info is just a few clicks away from this database.
Production Env Databases
By default, Airflow comes with a SQLite database, but since it does not allow parallelization, so it can’t be used in real-time productions.
So that’s why for production environments we usually keep a strong relational database; MySQL or Postgres.
Scheduler
This is the key component of Airflow architecture and why not, since this is the one that instructs and triggers the tasks on worker nodes.
Scheduler basically, you can assume as a ‘powerful Cron’, with some more features.
It’s a python process that uses
DAGdefinition in conjunction with the state of tasks stored in the metadata database and decides what tasks need to be executed, when they should run, as well as their execution priority.So it basically goes into your
DAGdefinition file, read the configurations from it, like you may have written a logic that task t1 will execute first before task t2. And then after readingDAGit starts running the tasks accordingly.All these things, it does in conjunction with the task states stored in metadata.
🕯️ Scheduler is tightly coupled with
DAG, so suppose if your scheduler is up and running, meanwhile you made some changes to yourDAGdefinition, then to make scheduler read and reflect those changes, you might have to restart it, then only the new tasks will run with your new configurations.
Webserver
The basic task of the webserver is to host the front-end over HTTP. This frontend is the UI component of Airflow with which a user interacts with.
It is the Airflow’s shiny UI component where you can view your underlying tasks, their states, execution time, and every other data in a simple neat, and clean view, where a view can be a graph, numbers, or any other representation.
To get your views ready, the webserver runs and communicates with the database to render the task states and logs in the web UI.
🕯️ Web-server is basically a flask application talking to the metadata database through some connectors.
Executor
🕯️ Executor actually performs the tasks at ground level. The job of a scheduler is only to trigger the tasks at right time, but these are the executors that actually carry out those tasks.
The executor is a message queuing process that works closely with the scheduler and defines the worker processes which actually execute the scheduled tasks.
Or in simpler words, you can say the executors figures out what resources or what workers will actually complete those assigned tasks.
Now there are different types of executors available, you can choose from them depending on your Airflow environment. By default, Airflow uses the Sequential Executor that can run only one task instance at a time.
Since there is no parallelism in sequential executors so they are not used in production and are commonly used for testing purposes.
Single Node vs Multi-Node Cluster
Other than sequential you can choose from other executors depending upon the Airflow cluster like a single-node or multi-node cluster system.
In
single-nodeIn airflow architecture, all the Airflow components like the webserver, scheduler, and worker are placed on a ‘single node’ called Master Node.In this
single-nodeconfiguration, to get the jobs done, we use Local executors. Local executor uses python processing module to execute tasks.This type of configuration is best suited if you have a moderate number of
DAGsin your Airflow applications.As in
single-node clusteryou cannot scale or add external resources and are totally dependent on the available resources at the Master Node. So in this architecture, you can scale up only until all the resources on the serverBut in case you are dealing with big data having a large number of
DAGs, then you would always consider switching to another Airflow setup which is Airflow’smulti-node clustersetup.In a
multi-node clustersystem, you have the same Airflow components like scheduler, webserver, airflow metastore, and all, but, in a multi-node system, only the webserver and scheduler are kept at the Master Node and the workers are placed separately in a different instance.The benefit of this architecture is, that
multi-node clusteryou can scale your cluster by easily adding new multiple worker nodes in your system. And for this reason, the multi-node cluster setup is considered as good for scalability.
Celery
For distributed workers on multiple machines, the recommended engine for workers is Celery. Celery is a job queue written in python and is used in distributed production systems to execute millions of tasks.
Now guys you have to wisely choose from the two — single-node cluster system or a multi-node distributed system.
Let's say if you are not dealing with TBs of data, then it’s the best choice to have the
worker and scheduler locally on the same machine rather than having the workers on multiple clusters.
So this was all about the architecture of Airflow.
While we start practicals you will be seeing how these components work together to schedule the jobs.
Installation and Usage
Installing Docker
First, start by downloading Docker Desktop
Once, Docker is installed, verify the installation by typing the following in your command line.
The commands below should output the version of Docker you installed and the location of the “bin” folder.
Mac OS
docker --version
where docker
Getting the Files
Puckel, who is the top contributor to the Airflow project has already created a
docker-composefile and provided it to us in a git repository. We just need to clone that project in our setup.Navigate to a directory on your laptop where the downloaded repo would be located.
Install Git, once installed, open git bash and download this repository, this will download the
DAGsfolder, thedocker-compose.ymlfile, and other files needed.
git clone <https://github.com/puckel/docker-airflow>
I’ve already extracted the files. So I will directly go to that folder. So this is the folder you will get after extraction.

Fig 2: Folder Structure.
Notice that I am using Visual Studio Code as my IDE (Integrated Development Environment), you should download the Docker Extension on that platform for it will give you more control over your containers and workflow.
Inside, we have various files and folders written for Docker Airflow. There are two compose files; one is for Celery Executor and the second one is for Local executor.
Let us open this Local executor compose file. See, inside it, we have all the configurations written that are required for our Airflow setup written in YAML. As of now, I am specifying only two services in the compose file. One is Postgres and the second is Webserver.
🕯️ For the moment, just keep in mind that many services that we are gonna use in our Airflow application will be configured from here.

Figure 3: Local Executor Compose file.
You can see Postgres with its environment variables like username, and passwords. Next, we have web-server and its port 8080. Volume mount… and other stuff.
🕯️ Please edit the compose file and add the “
redis” service, all you need to do is just write the correct configurations as shown above. Watch for the indentations!
Now let’s run this file in Docker and start the Airflow services. Hop up to your terminal.
VSCode → Terminal → New Terminal
Docker Compose
The method which we will go by is using a tool called ‘
docker-compose’. Docker-compose is a tool for defining and running multi-container Docker applications.Also, this time we don’t have to worry about the connections between containers. Everything will be done automatically.
Go to the directory path where the
docker-composefile is located.To run compose, type
‘docker-compose -f’(means file) and then specify the YAML file name i.e.,docker-compose-LocalExectuor.ymland at last, the optional parameter ‘-d’,In order to install Apache Airflow as a Docker container, please use the following command:
macOS
docker-compose -f ./docker-compose-LocalExecutor.yml up -d
-d ; tells docker to hide the logs, and run the container in the background.
So as output it will just print the container ID, after a successful run.
To check what images are present in our system, run this command;
See you have three images, which you just pulled through the compose file.
Airflow is installed in our system!
docker images
>> {result of command below}
REPOSITORY              TAG       IMAGE ID       CREATED         SIZE
postgres                9.6       027ccf656dc1   4 months ago    200MB
redis                   6.2.2     739b59b96069   14 months ago   105MB
puckel/docker-airflow   1.10.9    3e408baf20fe   2 years ago     797MB
So currently airflow, postgres & redis containers are running. This should reflect on the Docker Desktop Application.

Fig 4: Docker Desktop Showing running containers.
🕯️ In short, all you need is to just make the required configuration changes in YAML file and, leave it for docker-compose.
Docker will do the rest stuff of pulling the image, setting variables, build the networking amongst different containers.
Setting Up Airflow via Docker Containers
Okay so now let’s hop up to the browser at the same address we defined in compose YAML file localhost 8080.
Basically, this is the port (http://localhost:8080/) where Airflow’s UI is hosted.
This is the first look at Airflow’s UI and we got a
DAGnamed ‘tutorial’ in theDAGslist.Actually, this is the default
DAGwhich is already been created for us as an example. We will look into thisDAGand also create our ownDAGsin the coming series.

Fig 5: Airflow UI.
DAG reference & location
How airflow understands where our
DAGsare located through the “volumes” bit, this mounts our file in the airflow folder which is read through Docker.

Fig 6: DAG mount.
It is also defined in the airflow config file →
airflow.cfg

Fig 7: Airflow Configuration File Snippet.
🕯️ The Scheduler is the component of Airflow that inmates the DAG Run.
Executing our first DAG!
To run our first
DAG, head to the Airflow UI on port (http://localhost:8080/)Turn on the default
DAG“tutorial”Hover over to the links tab and click “Trigger”
You will be prompted “Are you sure you want to run the tutorial now?” and click OK.

Fig 8: Triggering DAG.
Open up the graph view tab in the UI. We have a print date, sleep, and templated tasks. Refresh the page again. All tasks have successfully been completed.

Fig 9: Graph View.
Now let’s quickly see the logs for each task and see their outputs.
‘print-date’ logs
Now since we know about the
DAG, it would be quite easy for us to understand this log. First for print date. ‘starting attempt 1 of 2’.So there would be total of 2 attempts — 1 attempt that the scheduler will make by default plus, the number of retries we specified in
DAGthe definition file which was 1.And these are the logs for the first attempt. See, Its output is here. It has a printed date-time (in UTC). That was for the print_date logs. And since our task has executed successfully in the first attempt so there are no logs for attempt 2.

Fig 10: Print-Date Logs.
‘sleep’ task logs
For this task, there is a difference in the number of attempts, in this case, the total attempts are 4, which I guess all of you would have probably remembered. We had explicitly overridden the retries of this task to 3, so 3 plus 1 default attempt comes out to 4.
t2 = BashOperator(task_id="sleep", bash_command="sleep 5", retries=3, dag=dag)
Its output will show nothing.
But at the timestamp, you can see, that we have 5-second difference between the times when the command was started and when it finished.

Fig 11: Sleep Task Logs.
‘templated’ task logs
Last open templated task where we used ginger templates.
In the jinja template, we had a ‘for’ loop of 5. Here is the output for the same.
Execution date, 7 days added in the execution date, and then user-defined parameter — ‘Parameter I passed in’.
Great, So guys, in this lecture we learned what a
DAGdefinition file looks like, and what are its components.We learned how
DAGis instantiated, how tasks are created by assigning relevant operators to them and setting dependencies amongst them.This was a brief idea of how a
DAGfile is written.
Exercise: Writing our own DAG!
To create own very own DAG file and run it we start by;
Adding a python file to our dag folder in the project directory.
Our DAG name would be “
example_dag”Here we define two Operators “
make_dir” & “check_dir”. Save the file.

Fig 12: Our first DAG.
Okay good so to reflect this on our Airflow UI, run the following command.
docker-compose down
Then After
docker-compose -f ./docker-compose-LocalExecutor.yml up -d
Viola! Our new DAG is now reflected on Airflow UI, follow the commands as mentioned above and the tasks would be up and running.

Fig 13: Successful DAG run.